Saturday 23 March 2013

Club - Castle Rackrent Visit

I have said before i am a member of a model railway club in Edinburgh,  and last night there was a club visit organised to Richard Chown's layout Castle Rackrent in his basement for a running session.  Castle Rackrent is a Large O scale Irish narrow gauge layout.  All the loco's, Rolling stock and buildings are scratch built or kits, some very nice stuff.

This is the first time i have seen this layout or even been to a running session on one, so i was not sure what to expect, but what a great night of fun and laughs I had.


We arrived just before 8pm there was 8 of us, John B, John H, Donald, Brian, Ian, Steve, myself and of course Richard himself.  We had a quick run down of how the layout was operated and how the controllers and bell signals worked, then we were allocated a section of track to operate, there are 6 available so 2 of us doubled up.

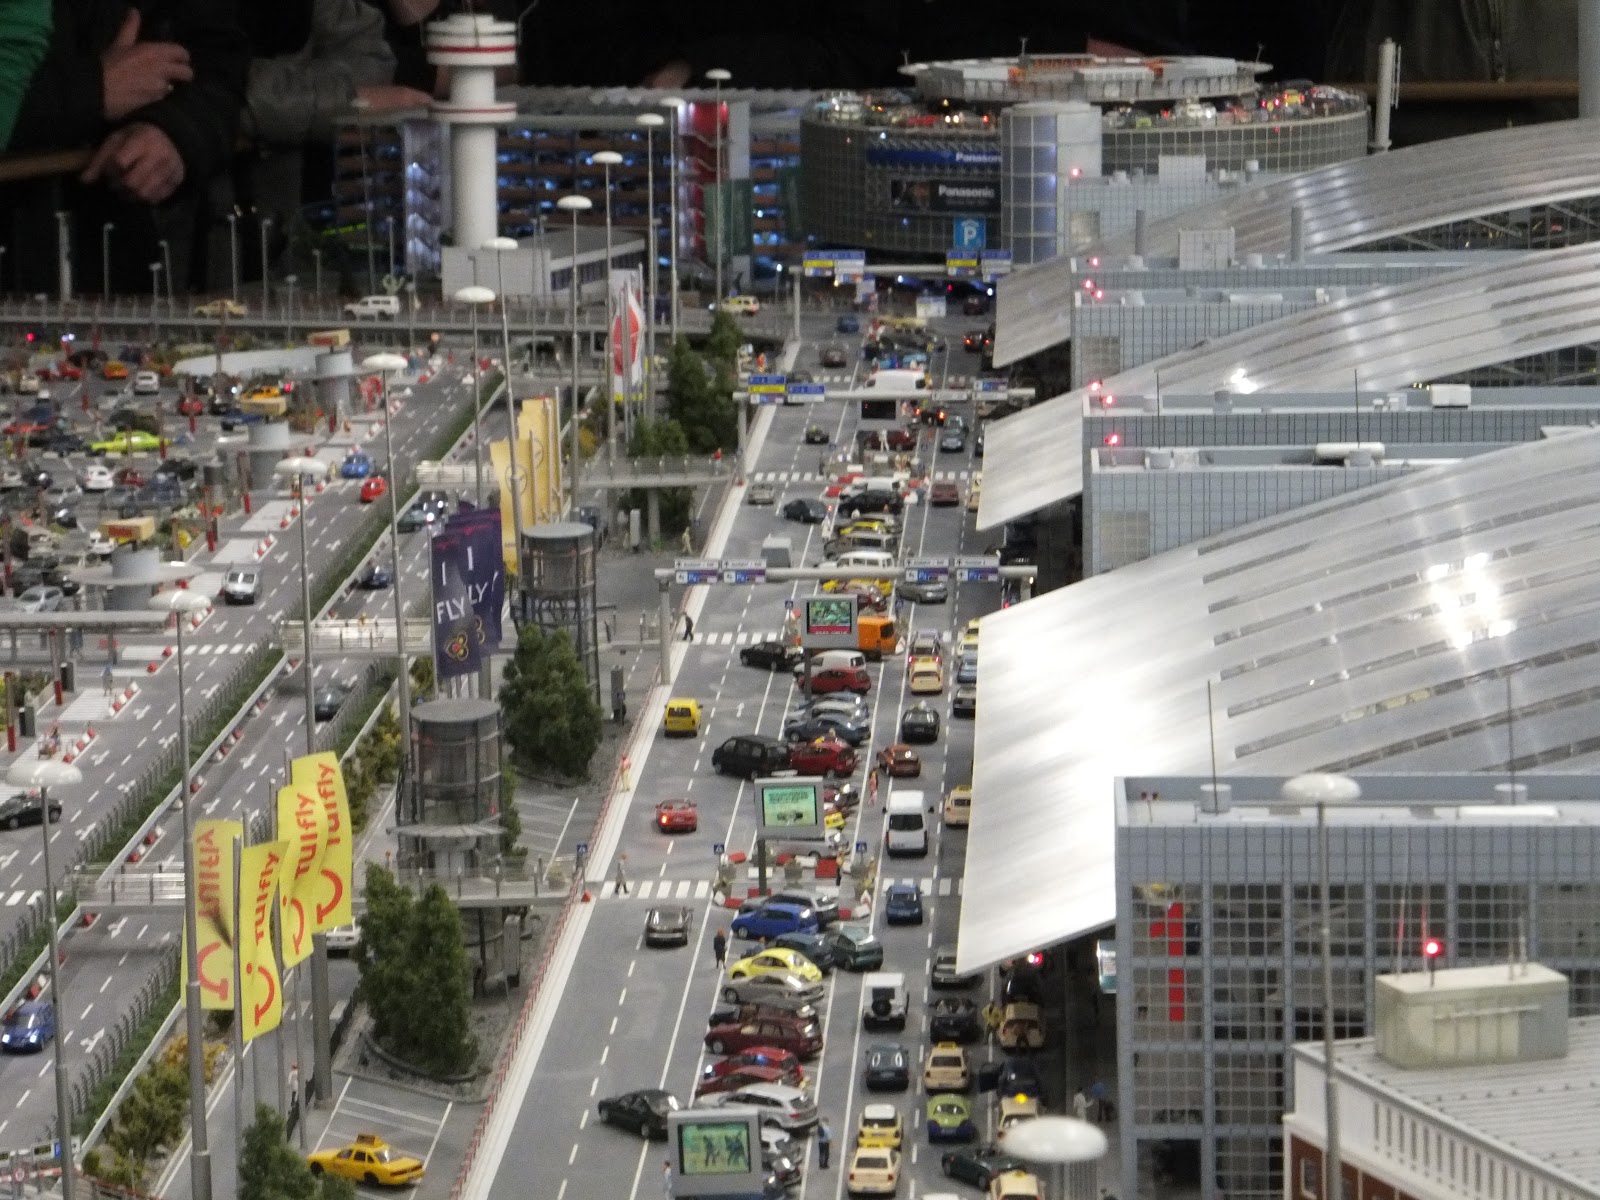
(This picture shows myself to the left, straight in front is Ian with brain just behind him.  Brian section was on the right.  Way in the back is John B in the terminus station and layout out owner Richard is on the right.)

I was given a small station section and was working with Ian, which was handy as i had no clue to what I was doing and Ian had operated there before, so he left me to do most of the work, while keeping a close eye on me.  Each station had a laminated sheet with a hair clip to keep your place, on one side there was a timetable and the other had all the bell codes.  above your head there was bells that were connected to different sections, we had two above our head the connected up to John B in a terminus station, and the other down to Steve and John B in the main station.

 
These are the station bells, for contacting the station up and down the line.  to let them know what you are getting or giving them.
 
 
Signal levers

We started our day at 4pm on the timetable (hair clip showed us this) then we were off. there was bell's going off all over the place, 1 ding for attention, 2 dings for season clear, 3-1 dings for P1, working the signals and points,  it was a good laugh, and Ian helped me allot, we started about 8:20pm and when i next looked up it was past 10pm.  I think over the course i saw about 5 trains, which does not seem like allot but, there was always things to do, and you were kept very busy.

 
John B at the Terminus Station ( the easy bit if you ask me, but john thought different)


At the front Steve and John H behind at a very busy section


Crib sheet for all those bell codes and the life saving hair clip.

With this being my first operating session, its an area of model railways i have never experienced before.  I have been to exhibitions with club layouts and operated for the general public to watch, and answering questions, but this was very different, it was more relaxed, there was good banter and a lot of laughs.  I liked the idea that from where you were standing you could not see other people's sections and you had a timetable with a list of trains to follow, it was all very well organised.

It has made me think allot about how my layout will operate, i will not have the space to have as many people in the attic, but i think 3 people would fit in ok, so i might look at ways to be able to operating running session in, rather than just a long run around.  But I might be able to have both.

Last line must go to a huge thanks to Richard for a fun night, many thanks.

Thursday 21 March 2013

Construction and Cuts


My baseboard construction is finished for the main track level, I only have the helix to build which I will have to get  drawn up and pick up some wood.


The construction is 50mm x 50mm timber framing, with a covering of a 6mm Hardboard.  I am no joiner but I am happy with how its finished even if I managed to cut my hands to shreds with screws and rough timber.  I plan to cover the top of the hardboard with 25mm polystyrene insulation to help with sound proofing and give a level base to work off.  .  So other than the Helix, I just need to clear all the scrap wood out, and build shelving units in my workshop to store all my stuff that is sitting fiddle yard just now.  Its handy working for a builders merchant to pick up the bits I need at a better cost.  I just need to start working for Kato now as I think I have bought enough stuff to get shares in the company.

-------------------------------------------------------------------------------------------------------------------------

On that note I have made another buy, of the Kato viaduct station set, to use as the base for my passenger station.  I have some plans to merge this kit with the Greenmax multi story station building I picked up a few weeks ago.   I am looking to double the station up to take 4 lines of track, so there can be a passing loop on each side.  I also have a Kato high level station I want to work into as well.  It will be a large station but I don't want it to look like different buildings throw together, and with the stadium opposite it will not look to bad.


I plan to Double the width of the Station to take 4 lines.


Plazajapan (need to get sponsorship from this guy) is selling N gauge cardboard kits,  now people that know me, know I am not into card buildings on a layout as they can tend to warp or look very shiny.  But these are just small detail parts that look very good.  The company is called Sankei, they do lots of buildings and small detail parts for N Gauge.  I picked up a venting machine set for only £2.50, I am going to place them in the station and around the football stadium.  Should they look ok, I will branch out to other detailing kits.
I have also picked up 500 painted n scale people for £10, as I will need many thousand for the stadium I will keep all the seated people out, ready to paint in the team colours of yellow and black.
-------------------------------------------------------------------------------------------------------------------------

On a total different note, was sent video today unreal.


Saturday 16 March 2013

Baseboard Construction

With some free time this weekend I have made a start at building the baseboards for the layout.  Having managed to relocate half the crap that seems to have built up in the space, I now know how much space I have. 


The first picture shows how it was when I first start to design my new N gauge layout.
This view is from my workshop area looking down the length of the room, the shelves on the left will become my fiddle yard or sidings via a helix in the workshop.  The boards below the sidings will have my station, which will be located in the city centre.  At the very back the city will continue to the right with a few bridges crossing the opening to the baseboards to where the stadium will be built.  To the front of the photo on the right this will be an Industrial area and the multi story car park will be located around here.


The above photo is looking into my workshop, which will soon be stripped out  and the boards for the Helix built.  Both sides of the baseboards need to be connected up to complete them, but I have run short of the top boards.
 
When building this side I had to take into account the size of the stadium so I have drawn a rough outline on the board to show where is will sit.  and how much space I will have around it.  I am thinking of the Kato Tram System to service the stadium from the main station.  The stadium will be some size and I am looking forward to starting to built it.  I will add more photo's when I have finished this weekend.

------------------------------------------------------------------------------------------------------------------------

With the rest of the time that was left to me this weekend, I managed to strip out the workshop area of all the shelves and remove all the junk that was under the work bench.


I have now cut the hole in the workshop wall to allow my trains to go from the workshop to the Sidings on the shelves above the main boards.  To finish the base boards I have to build the helix and fill in two areas with the top cover board, I am a few pieces of wood short so this will need to be done another weekend.

Monday 11 March 2013

Doctor Shinkansen

Doctor Shinkansen

 
I have been after one of these for a while and came across this one on E-bay for £58 so i put a wee bid in and won.  I will keep my eyes open for the 4 car add on set to complete it.  I was not really looking to add more Loco's to my collection as i am looking to add more track and buildings,  so i guess the track will be waiting for another few weeks.   There is some info below on the Doc i found on the web, makes for good reading.


TOMIX 'N' GAUGE 92227 JR923 SHINKANSEN 3 CAR SET

 Doctor Yellow (ドクターイエロー?) is the nickname for the high-speed test trains that are used on the Japanese Shinkansen ("Bullet Train") dedicated express passenger train routes. The trains have special equipment on board to monitor the condition of the track and overhead wire, including special instrumented bogie's and observation blisters.
The 'Doctor' part of the name is obvious from their test and diagnostic function, and the 'Yellow' part comes from the bright yellow colour they are all painted. Some have a blue waistline stripe, some a green one. The original colour scheme of yellow with a blue stripe (applied to the Class 921 track-recording cars) was created by reversing the colours (blue with yellow stripe) used on 1,067 mm (3 ft 6 in) narrow-gauge track-recording cars.
In build and appearance, they are very similar to production, passenger carrying Shinkansen trains, and line inspection is carried out at full line speed (i.e. up to 270 km/h/168 mph on the Tōkaidō Shinkansen).


From the Japan Times

‘Dr. Yellow’ train keeps line safe, elates spotters

NAGOYA — A seven-car shinkansen line inspection train runs about once every 10 days between Tokyo and Hakata in Fukuoka Prefecture, and rail buffs who spot it claim it brings good luck.
The train has been nicknamed “Dr. Yellow” because of its colour but it is officially called a comprehensive shinkansen test train.
Nobumasa Naruchi of West Japan Railway Co.’s shinkansen management headquarters said it is “what you might call an X-ray train, in that it collects data on deflections of overhead wires and bending of the rails while running.”
The train’s job is to inspect aboveground equipment.
On Jan. 29, the Tokaido Shinkansen Line was halted in Kanagawa Prefecture when an overhead power catenary severed, apparently after being struck by an out-of-place pantograph — an accordionlike device that extends from the train to touch the wire and thus transfer electricity to the train’s electric motors.
The test train that travels the 1,174-km distance between Tokyo and Hakata is popular with rail fans. An urban legend has it happiness comes to those who spot it.
Its timetable is not published. Nevertheless, a Web site details the places and times it passes so those interested may figure out when they can see it. A cheering crowd with cameras was on hand when Dr. Yellow pulled into Shin-Osaka Station en route to Hakata in December.
All of the coaches’ windows are blocked out. Carriages six and seven house large equipment to gauge signals and electricity. A dome in coach five lets inspectors view pantograph connections.
A special platform under the floor of coach four is used to inspect the tracks.
Gear to control the dome and all data collected by the various diagnostic equipment is fed to coach three. Coach two carries a device to check wear on the overhead power cable. Signals and power are monitored in coach one.
“Based on data provided by Dr. Yellow, maintenance workers on the scene fine-tune electric wires and the rails,” Naruchi said. “That’s a rewarding job for us.”

Saturday 9 March 2013

Layout Design and Track Plan

Using the AutoCAD drawing programme, i have drawn my attic to scale, showing the full area i have to build my layout in.  As i was wanting to see if i could fit a football stadium in, i thought this was a good idea.  So once i had a plan of the stadium drawing up i worked out the best place for it to go, then designed the track plan around it.
 
I have a display shelf that sits about 400mm above my baseboard height.  I used to keep war gaming models there, but i sold them all off, to buy more N Scale stuff, so the shelf was going to be coming down, but i have decided to give it a new lease of life, as my fiddle yard or sidings.


The track layout will be one massive loop, the track will be a double line running through the scenic sections and at each end there will be a loop.  The plan is to have the trains run over the layout on one side of the track and return on the other.  This will give the train the impression of going somewhere then coming back, (an idea i must say i have taken from a Club Layout, Ausfarht Sud - designed by John Bowman (http://www.thistle-modelmakers.com/ausfarht%20sud.htm)).   And it will also allow me to have trains running and not worry about them,  I am not planning to chip all my locos to run DCC just now, but that will be the plan once i have the money for all the chips.  In the workshop area i am planning to have a Helix to take the track from the baseboard level to the yard level. The yard will have a loop around the outside with the sidings off points in the middle.   The other loop will be under the Helix.


This will limit me to just a few loco's running at the same time as they will all be on the same piece of track, but i am happy with this, as i have said before there is not much scoop for shunting or switching.  I prefer to just see trains running, i will put a siding in the Industrial area and in the station.


The double shelf will loose a level and become my fiddle yard/Siding.
____________________________________________________________________________

I have picked up two buildings from eBay and Plazajapan.

The first is this multi story car park, which i am going to place near the football stadium for parking, I have 3 bags of N gauge cars with around 100 cars in each, so i will be filling this with cars, lights and fans.  The kit was £35 with £10 postage form Japan.

Aoshima Parking Garage in Blue W 213mm x D 226mm x H 141mm

The Second building is an Industrial Plant Factory, i am planning to have an area of the layout turned over to Industry.  So i have a reason to run the Freight i have bought.  There are a lot of nice industrial buildings by greenmax, So this area will have a mixture of different plants and factory's, with lots of pipe work.  This Kits was £15.00 and the postage was combined with the car park for a total of £16.  So i got everything for about £76 which i was very happy with.


 Plant Factory - Greenmax No.2144 (1/150 N scale)

Thursday 7 March 2013

Stadium Design

After coming back from Wunderland and seeing the super Football Stadium, i have decided to try and put one into my N-Gauge layout.


I am a big Glasgow Rangers fan for my sins and first thought about building there stadium Ibrox, but thought i would never run British Loco's only European and Japanese.  So i started looking for a Stadium to build in Europe and one i have seen a game in while following my team.


I have been to Germany a few times for the football so started my search there.  I came Across Architects Plans for Borussia Dortmund's Stadium, Westfalenstadion which has a capacity of 80,720.  In December 1995  i was at a game between both teams which finished 2-2.   So my mind was made up and i was going to try build it. 
Using a Drafting package called AutoCAD i managed to get the drawings scaled down to 1:160, i had a lot of messing about drawing football pitches to scale and trying to match them up, but it was worth the stress.  Having scaled the drawings down to N Gauge the stadium was going to be 1.2m (4 foot) by 900mm (3 foot) in size.  Which turned out to be just a little to big for the place i had in mind for it.  So i had to scale it down by another 20% to get it to fit in.  The complete stadium will measure 1m by 800mm and be 200mm high to the roof.

Stadium Plan i have managed to scale down

Section

Elevation

 
The Opposite is the Drawing of my Attic space (Sorry its a bit light, but should be ok when you open it) with the location for the stadium, it is gonna be the main point of interest in it, but with the Burger stalls, Street Sellers, Crowd, inside stadium detail and all the rest that goes on around sporting events, there is loads of scope for detail.  I am still working on the track layout, but a simple double loop with some large storage track in my work area will not be far away.
 
I don't think you can do much shunting or switching in N Gauge, so some nice long runs for my passenger trains will be the order of the day.  Straight across from the stadium i plan to build a large passenger station.  The rest of the layout will be left to a compact high rise city and Industry area.
 
As the track plan progresses i will update it.


Friday 1 March 2013

Wunderland Pt 2 The Airport......


Wunderland the Airport

(Following text is from Wunderland webpage, Photo's are mine)
 
 
Airport Plan
 
 
In the past years, embedded between Knuffingen and Switzerland, Miniature Wunderland’s latest layout arose – our passenger airport. After more than 6 years of construction, it was inaugurated on May 4th 2011, at last. The development of the Airport began in June 2005, already. In 2008 the planning phase was finalised, and the final building plans were worked out.
Since the 22nd of August 2008 the plan was lying on the layout base, initiating the construction phase, officially. The layout arose right in front of our visitor’s eyes. Not only for aviation and technology fans, the impressive Airport is the new Wunderland highlight. Up to 40 different aircraft's (from Cessna to Airbus A 380) are taxing independently on this Airport to the gates. They are also being moved back from the gates by push-back vehicles in order to taxi to the runway. There they are accelerating and taking off or landing respectively. Each aircraft is equipped with original lights and original, realistic turbine sounds. 


Hamburg Terminal


The Carsystem of the Airport

In contrast to the original car system, our new vehicles at Knuffingen Airport are equipped with sensors, which transmit all data via infrared signals. Thus, it is possible to simulate a more dynamic movement of any vehicle, and lights, turn signals, as well as speed levels can be switched and altered while driving. Furthermore, infrared technology enables a more precise position analysis. Thus, the vehicles can drive with a shorter safety distance to other vehicles in traffic. Constructing the Airport vehicles was quite challenging for the team. In order to stuff ever more technology into ever smaller vehicles, we had to make many laborious modifications. Here, we have to point out those relatively small interior cleaning vehicles for the Airport, as all components had to be exchangeable, in order to save time when repairing them.
The following vehicles can be seen on the Airport, as well: tankers, catering trucks, de-icers, septic tank trucks, garbage trucks, luggage cart tugs, dispenser vehicles, passenger shuttle buses, crew shuttles, snow ploughs and blowers, as well as ground staff vehicles.
However, the yellow-black Follow-me vehicles, which usually direct aircraft's on the airfield, do not exist on Knuffingen Airport, in this manner. Because the more tiny the technology, the more difficult it becomes to synchronise two vehicles following each other on the same stretch. Here, even two identical motors have different handling characteristics. That’s the reason we’ve created a fleet management system, functioning via lit carriageway markings, directing the pilot over the airfield. In reality, a similar system has been established on the London and Munich Airport by now – it seems as if our idea was not too far-fetched, after all.


------------------------------------------------------------------------------------------------------------------
 
I spent well over 4 hours looking at this section of the layout, over the weekend.  There are 28no. Flying planes and i must have seen most of them take off, there is even a Bee and a USA Shuttle.
 
 
Sorry for the shaky camera at the start, but it was still getting used to my new camera.  On the Sunday we had a behind the scenes tour, the operation system in place for stacking the planes for take off, is a work of art.  The road system in the airport is very cool, each plane has a fuel tanker, bus (if required).  There is a working Flight information board, which tells you which is the next flight coming in and going out, All very impressive.